Adding a folder of notes to Nogon used to mean looking up the YAML keys for the folder and its file types. Nogon 0.22.0 introduces Settings, a graphical editor where you can find those options, see what they do, and apply them from your browser. You can start here on a fresh installation or move individual settings over from an existing config file.
Make your first change
Open the navigation menu in the upper right and choose Settings. If your instance uses an access token, sign in with it. If it has user accounts, sign in as an administrator. The changes you make here apply to the instance.
Try giving your collection a name. Under App, find Appearance and
change Title to something you’ll recognize, like Workshop library.
The bar at the bottom now shows 1 unsaved change.
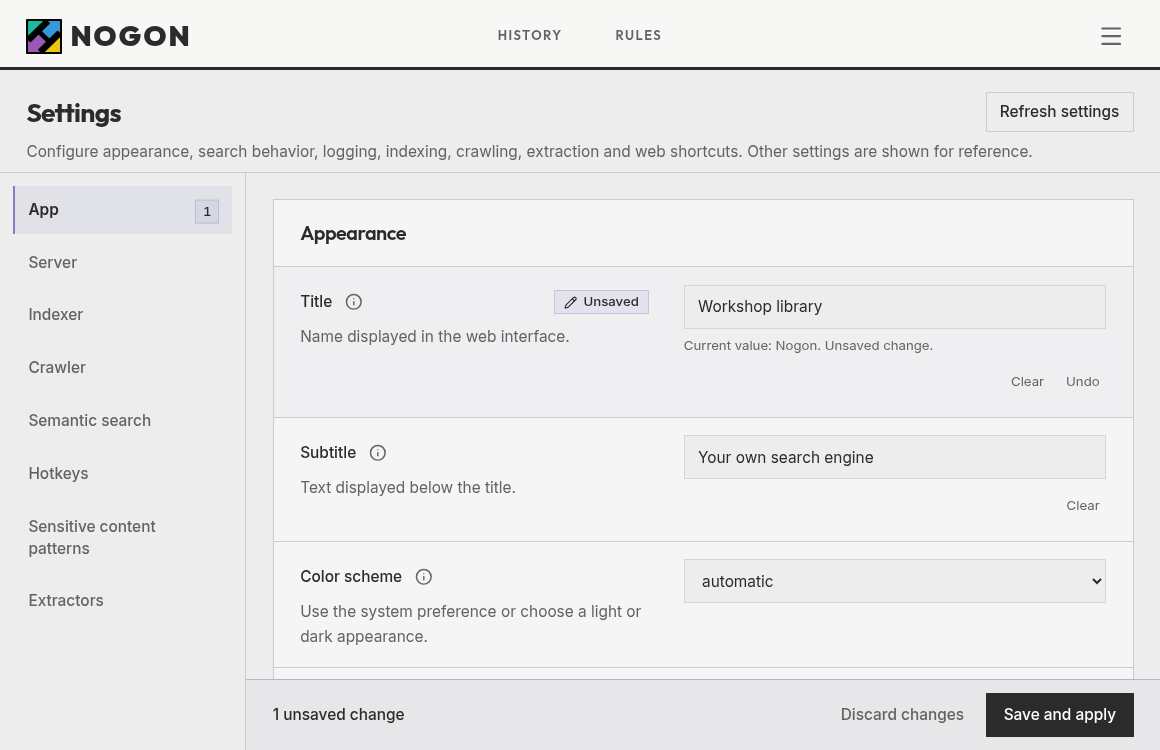
Choose Save and apply, then return to the home page to see the new title. If Title is locked, the steps below show how to move it over from your config file.
Put a folder of notes in your index
Under Indexer, find Watched directories and select Add directory.
Enter the full path to an existing folder the server can read. If you keep
Markdown notes alongside other files, open Filters and options and enter md under File types. If your instance has user accounts, set Owner to your username for notes that only you should see.
Select Add directory to finish the entry, then Save and apply. Nogon scans the folder and watches it for new or edited notes. If you later remove the folder from Settings, Nogon stops watching it. Previously indexed notes are still searchable.
Under Hotkeys, you can assign a keyboard shortcut to open a preview. Under Extractors, you can enable the tools Nogon uses to read particular kinds of pages. You can save edits from several categories together or choose Discard changes to drop the draft. If an entry needs correcting, Settings points to the field and keeps your other edits.
Bring over a setting from your config file
When a field says Locked, select the label to see what sets its value. An explicit entry in your main config file takes priority over a web choice, even if the entry matches the default. You can use this to keep your server address in YAML while managing titles, folders, or shortcuts in the browser.
Suppose your config file already sets title: Workshop library under app and you’d like to manage that title in Settings from now on.
- Comment out just the
titleline in the file your server uses. - In Settings, select Refresh settings, then Reload configuration when prompted. You can also run
nogon reloadfrom the command line. - Open App and check Title. Nogon now uses your previous web choice,
or the default title,
Nogon, if you’ve never saved one. EnterWorkshop libraryand select Save and apply.
If the field is still locked, check its source again. Startup flags take priority over environment variables, and both take priority over the main file. Lists such as watched directories and shortcuts move as a unit. To manage one in the browser, keep a copy of its entries, comment out the whole list, reload, and add the entries you want to keep in Settings.
Nogon saves web choices in config.web.yml in its data directory. To remove
a saved choice, select Reset, then Save and apply. To manage the title
in YAML again, uncomment its line and reload. Some options, including the data
directory itself, are always managed outside the browser.
When a change affects access
Saving briefly interrupts service. If you change how you sign in or how you reach the server, Nogon asks you to review the change first. After applying it, open Settings at the address shown and confirm access within two minutes. If you can’t reconnect in time, Nogon restores the previous configuration so you can use your original address and credentials. The configuration guide covers these confirmations and the settings available in each category.